Old wooden furniture often sits in our homes bearing the marks of years gone by—dull surfaces marred by fingerprints, faded finishes clouded by grease, dust, and previous polishes. These pieces don’t lose their charm because the wood is damaged but because they become covered in layers of grime that suffocate the original beauty. Fortunately, leading restoration experts agree there’s a remarkably simple way to breathe new life into these forgotten treasures without expensive refinishing or harsh chemicals.
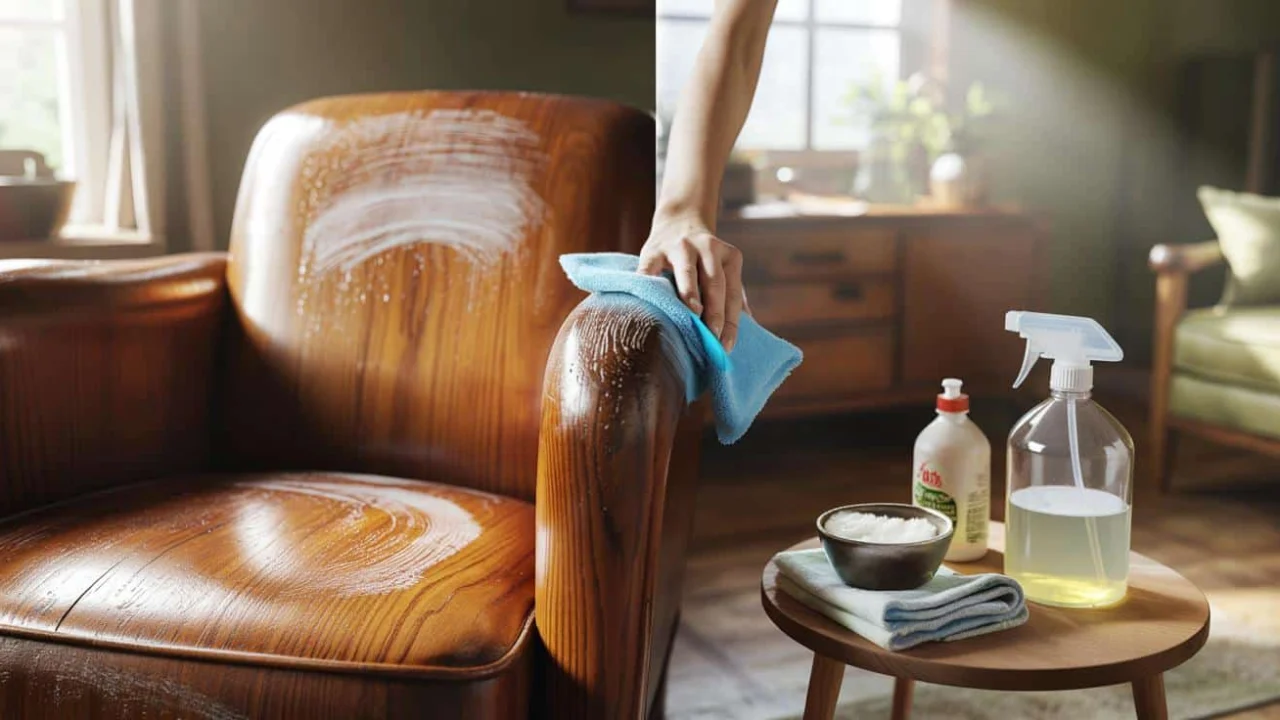
With nothing more than a microfiber cloth and a basic homemade cleaning solution made from ingredients found in most kitchens, you can restore the natural depth and glow of wood surfaces quickly and safely. This gentle approach respects the wood’s existing finish while clearing away years of accumulated dirt, making old furniture look almost brand new. The secret lies in a mix of warm water, white vinegar, and a touch of mild dish soap—an understated recipe praised by professionals worldwide for its efficiency and ease.
By carefully following this method, even the most neglected pieces can regain their original shine, revealing the hidden potential beneath layers of everyday wear. This article dives deep into why this simple solution works, how to apply it properly, and how to extend the life of your wooden furniture with minimal effort.
Key Ingredients and Why They Work Together
| Ingredient | Purpose in Wood Restoration |
|---|---|
| Warm Water | Softens surface grime and dirt for easier removal |
| White Vinegar | Gentle acid that breaks down old polish residues and mineral deposits without harming wood finishes |
| Mild Dish Soap | Lifts oils and grease from fingerprints and cooking vapors |
| Microfiber Cloth | Catches and holds dirt particles, avoiding scratching and re-depositing grime |
Why Old Wood Furniture Doesn’t Need Refinishing Right Away
It’s tempting to reach for aggressive cleaning agents or sanding tools when furniture looks tired. But many restoration experts emphasize that the wood underneath is often perfectly intact. What obscures the beauty isn’t damage but a film made from dust, silicone-based polishes, oily fingerprints, and airborne grease. This layer suffocates the wood, dimming its natural sheen and flattening its color.
Because of this, the most vital first step is gentle cleaning. Stripping away the surface grime reveals the wood’s inherent glow without risking harm to its finish or altering stains and varnishes. Using harsh products or vigorous scrubbing can damage delicate old finishes, making problems worse. Patience and the right solution balance effectiveness and respect for the timeworn wood beneath.
How to Prepare and Use the Restorer’s Solution Safely
The preparation is straightforward: mix roughly 1 cup of warm water with 1/4 cup of plain white vinegar and just a drop or two of mild, fragrance-free dish soap in a spray bottle. Shake lightly to blend. The key is using a very diluted solution that’s strong enough to clean but gentle enough to preserve finishes.
Before applying to the entire piece, always test a small, hidden area like the back or underside to check for any adverse reactions. Apply the solution to a soft microfiber cloth rather than spraying directly onto the wood, so the cloth remains just damp rather than wet. Wipe gently following the wood grain using slow, light circular motions, frequently folding or flipping the cloth to avoid re-depositing dirt.
Immediately after cleaning an area, buff it with a second clean microfiber cloth to remove remaining moisture and begin revealing the restored shine. This quick drying helps prevent water damage and intensifies the subtle glow. Working in small sections—drawer fronts, cabinet doors, armrests—allows you to appreciate the transformation after each pass and avoid over-saturating the wood.
The Importance of Gentle Care and Patience During Restoration
Restoration experts warn against rushing or dissolving grime with excessive water or force. Wood is porous and vulnerable to moisture, which can warp surfaces or encourage mold growth. Overzealous scrubbing can embed grit into delicate finishes causing scratches that become permanent blemishes.
Instead, treat cleaning as a polishing exercise—more like carefully cleaning glasses than scrubbing pots. Slow, deliberate strokes and gentle pressure yield the best results. This tempered approach not only protects your furniture from damage but also encourages a deeper and longer-lasting freshness.
Protecting and Maintaining Your Furniture After Cleaning
Once the grime is gone and the wood’s natural luster shines through, the next step is protection. Restorers recommend applying a thin layer of high-quality beeswax or a specialized furniture wax to seal and nourish the surface. This not only deepens the renewed sheen but also shields the wood from future environmental impacts such as moisture and dust accumulation.
Applying wax sparingly ensures a natural finish without buildup while making future cleaning easier. Regular dusting combined with periodic gentle cleaning using the homemade solution can maintain that “almost new” glow, turning your furniture from “old” to cherished and ‘lived-in’ over the years.
How This Simple Method Changes the Way We See Old Furniture
There’s a quiet revolution taking place in homes and studios, prompted by the discovery that restoration doesn’t always require expensive or complicated intervention. After experiencing the impressive results of this accessible technique, many start viewing their old furniture differently—not as worn-out or disposable but as pieces with hidden promise.
This shift can renew emotional connections to family heirlooms or trusted furnishings, transforming tired tables or dulled chests into beautiful focal points that express history and care. By recognizing that many finishes can be saved with a soft touch, homeowners gain confidence to take on restoration projects one small step at a time.
Winners and Losers in Furniture Restoration
| Winners | Losers |
|---|---|
| Old wooden furniture regaining original beauty without sanding or refinishing | People rushing to use aggressive chemicals or heavy sanding without trying gentle cleaning first |
| Homeowners saving money by using common household ingredients | Furniture finishes damaged by excess water or harsh scrubbing |
| Restorers able to complete quick surface refreshes instead of expensive, time-consuming refinishing | Premature disposal of furniture that could easily be revivified |
Expert tips to get the best results
“Most people don’t realize that their ‘ruined’ furniture is often just buried under years of household buildup. The solution isn’t complicated; it’s patience and respect for the wood’s original finish that counts.”— Paris-based Restoration Specialist
“The microfiber cloth is crucial. Unlike old rags, it traps dirt instead of dragging it around, meaning cleaning is effective and safe. Always keep your cloths clean and dry after use.”— London Furniture Restorer
Frequently Asked Questions About Restoring Wooden Furniture
What types of wood finishes are safe to clean with this vinegar solution?
Most common finishes, including varnishes, lacquers, and polyurethane coatings, are safe to clean gently with this diluted vinegar and soap solution. Always test a concealed area first to be sure.
Can I use this method on all wooden furniture?
This method is best suited for sealed and finished wood surfaces. Avoid using it on raw, unfinished wood or delicate antiques that may require professional care.
How often should I clean my furniture using this solution?
Routine cleaning every few months or as needed to remove surface grime works well. Avoid excessive frequency to preserve protective finishes.
What if my furniture has stubborn stains or deep scratches?
This solution primarily addresses surface dirt and old polish residue. Deep scratches or stains may require professional restorative treatments or refinishing.
Is it necessary to apply wax after cleaning?
Applying a thin layer of quality beeswax or furniture wax after cleaning enhances shine and protection but is optional depending on furniture use and preference.
Can I use a different cloth if I don’t have microfiber?
Microfiber is preferred due to its gentle, effective cleaning action. Avoid rough or abrasive cloths that could scratch the finish.
Will white vinegar damage my furniture’s finish?
Used in diluted form, white vinegar is gentle and safe for most finishes. Full-strength vinegar or prolonged exposure can cause damage, so always dilute and limit contact time.
How important is the drying step after cleaning?
Drying immediately with a clean cloth prevents moisture damage and helps bring out the wood’s natural luster, making it an essential part of the process.
What homemade solution is recommended for reviving old wooden furniture?
A simple homemade cleaning solution made from warm water, white vinegar, and a touch of mild dish soap is recommended for reviving old wooden furniture.
Why is white vinegar included in the cleaning mix for wooden furniture?
White vinegar acts as a gentle acid that breaks down old polish residues and mineral deposits without harming the wood finishes.
How does a microfiber cloth help in cleaning wooden furniture?
A microfiber cloth catches and holds dirt particles, avoiding scratching the surface and preventing grime from being redeposited on the wood.
Can this cleaning method replace the need for refinishing old wooden furniture?
Yes, this gentle cleaning method can restore the natural depth and glow of wood surfaces without the need for expensive refinishing or harsh chemicals.
What types of dirt and grime does the homemade solution help remove from wood surfaces?
The solution helps remove fingerprints, grease, dust, mineral deposits, and residues from previous polishes that accumulate on old wood furniture.
Is this cleaning method safe for all types of wood finishes?
Yes, the method is gentle and respects the woodu2019s existing finish, making it safe for most types of wood furniture finishes when applied properly.